Giant goose crochet pattern
So, you’d like to make a 5 ft tall crochet goose…
I don’t blame you. Heck, recently I was you. No one was there to show me what to do, but don’t worry… I’ve got you covered.
After posting my giant goose on Instagram, I was met with a comment that stuck with me, “I absolutely love it, but just one question (and not in a bad way)…why?”
So many reasons!
If you’ve followed me on TikTok for a while, You’ll know that I made a 7 ft long Haku the Dragon as a commission for a friend. At the time, I planned to make one for myself after I finished hers. Well, I’d never made anything that large before and when I was done, I decided maybe I didn’t want to do that again right away. Also, I couldn’t decide if I wanted Haku or another character, which began over a year & a half of pondering the idea.
Have you seen those giant plush geese for sale online? Well, I did. TikTok showed me a video of people saying their giant plush goose was stuffed with other geese. They were opening them up and pulling out more geese, like they were a Russian nesting doll. While I know it was a joke, I liked the idea of a goose stuffed with geese, and also just having a giant goose around. I like whimsy, what can I say?
That got me feeling the pull of a giant plushie in my life once again. The want slowly built into a need and before I knew it, I was debating which plushie to create all over again. I kept seeing random goose content and at some point, I just decided eff it, I’m making the giant goose! He will be my new BFF & life partner, and it will be grand.
Then I began searching for a goose pattern. I was planning on just scaling up the pattern and crediting the designer, but that didn’t work out. All of the designs for geese didn’t resemble the goose I wanted; a crocheted version of the giant goose plushie I saw online. So, I did what any overconfident Neurodivergent crafter does and decided to make it myself! I free handed the goose and wrote down what I did.
In the beginning, I’d planned to take photos and document the entire process, but that didn’t happen. I had brain surgery in February, and that threw my plans all out of whack. I’m still working on recovering fully, but I managed to finish the goose!
A lot of people were interested in the pattern, so I’ve typed it out below. As I mention in the introduction, this pattern has not been tested by other crocheters, or made more than once by anyone but myself. If you find any errors, please let me know and I’ll try to fix them. If you run into any issues or just have a question, I am happy to help you as best I can. Just shoot me a message here, on IG, or via email and I will do whatever I can to clarify & get you to your goal of crocheting a giant goose.
Giant Goose crochet pattern
By Grace Kelley
Introduction
Hello and thanks for your interest in my Giant Goose! I freehanded this goose, making it up as I went, but I wrote down what I did for reference. This is a typed up version of my notes so you can try to follow along and make your own.
Please note: This pattern has not been tested, and due to the sheer size of the finished product, I will not be making another to test the pattern myself. I did not take any pictures along the way either, so this pattern is basically text only. I will add in photos of the finished product for reference, but there are no process photos. Again, this is just my typed notes for free, untested, if you would like to attempt to crochet one yourself. If you find any errors or encounter any issues, feel free to reach out and I will correct them and/or help you as best I can.
UPDATE: Several Geese have successfully been made as of July 2023!
Happy Goosing! 🙂
-Grace
NOTE: This pattern is worked mostly in the continuous round. Do not chain 1 and slip stitch between rounds.
Size
Finished Goose is approx 5 feet long from nose to tail
Materials
Approx 4-5 skeins Bernat Baby Blanket yarn in White
Approx 200 yds Bernat Blanket yarn in Sunsoaked/yellow
Bernat blanket yarn in Black for the eyes (could use felt or safety eyes. My eyes are 4cm/1.5 inches wide)
6.5mm/K crochet hook
Yarn Needle, Scissors, Stitch markers
So much Polyfil!! (or stuffing material of choice. I used some blanket yarn scraps and about 5 lbs of polyfil)
Stitch key
SC = Single Crochet
SLST = Slip Stitch
MC = Magic Circle
INC = Increase - place 2 SC in the same stitch
DEC = Decrease - SC 2 stitches together (all decreases are worked as invisible decreases by using the front loops only)
FLO = Front loops only
FO = Finish off, or to close your stitches. Cut your yarn and pull through your working loop to secure it. When closing a MC, sew through the FLO and pull tight to close the circle. Leave a long tail for sewing when instructed.
Instructions
EYES (make 2)
R1: Form a MC, SC 6 [6]
R2: INC around [12]
SLST and FO, leaving a tail for sewing
Legs (make 2)
Toes (make 3 for each foot, or 6 in total)
In Yellow
R1: Form a MC, SC x 3 [3]
R2: SC, INC, SC [4]
R3: INC, SC, INC, SC [6]
R4: (INC, SC) x 3 [9]
R5: SC around [9]
FO. On the 3rd toe, don’t FO. We will SC the toes together on the next round
R6: With working loop on the hook place your hook into 2nd toe and SC 5, place hook into 3rd toe and SC x 9, Place hook into the next stitch on the middle toe and SC x 4, place hook into the 1st toe and SC x 9 [27]
R7: SC around [27]
R8: SC 4, DEC, (SC 5, DEC) x 3 [23]
R9-11: SC around [23] 3 rounds
Stuff, and continue stuffing as you go
R12: (SC 4, DEC) x 3, SC 3, DEC [19]
R13-14: SC around [19] 2 rounds
R15: (DEC, SC 5) x 2, DEC, SC 3 [16]
R16-R28: SC around [16] 13 rounds
Switch to white yarn
R29: INC around [32]
R30-35: SC around [32] 6 rounds
R36: SC x 2, (SC x 4, INC) x 6 [38]
R37-38: SC around [38] 2 rounds
SLST and FO, leaving a long tail for sewing
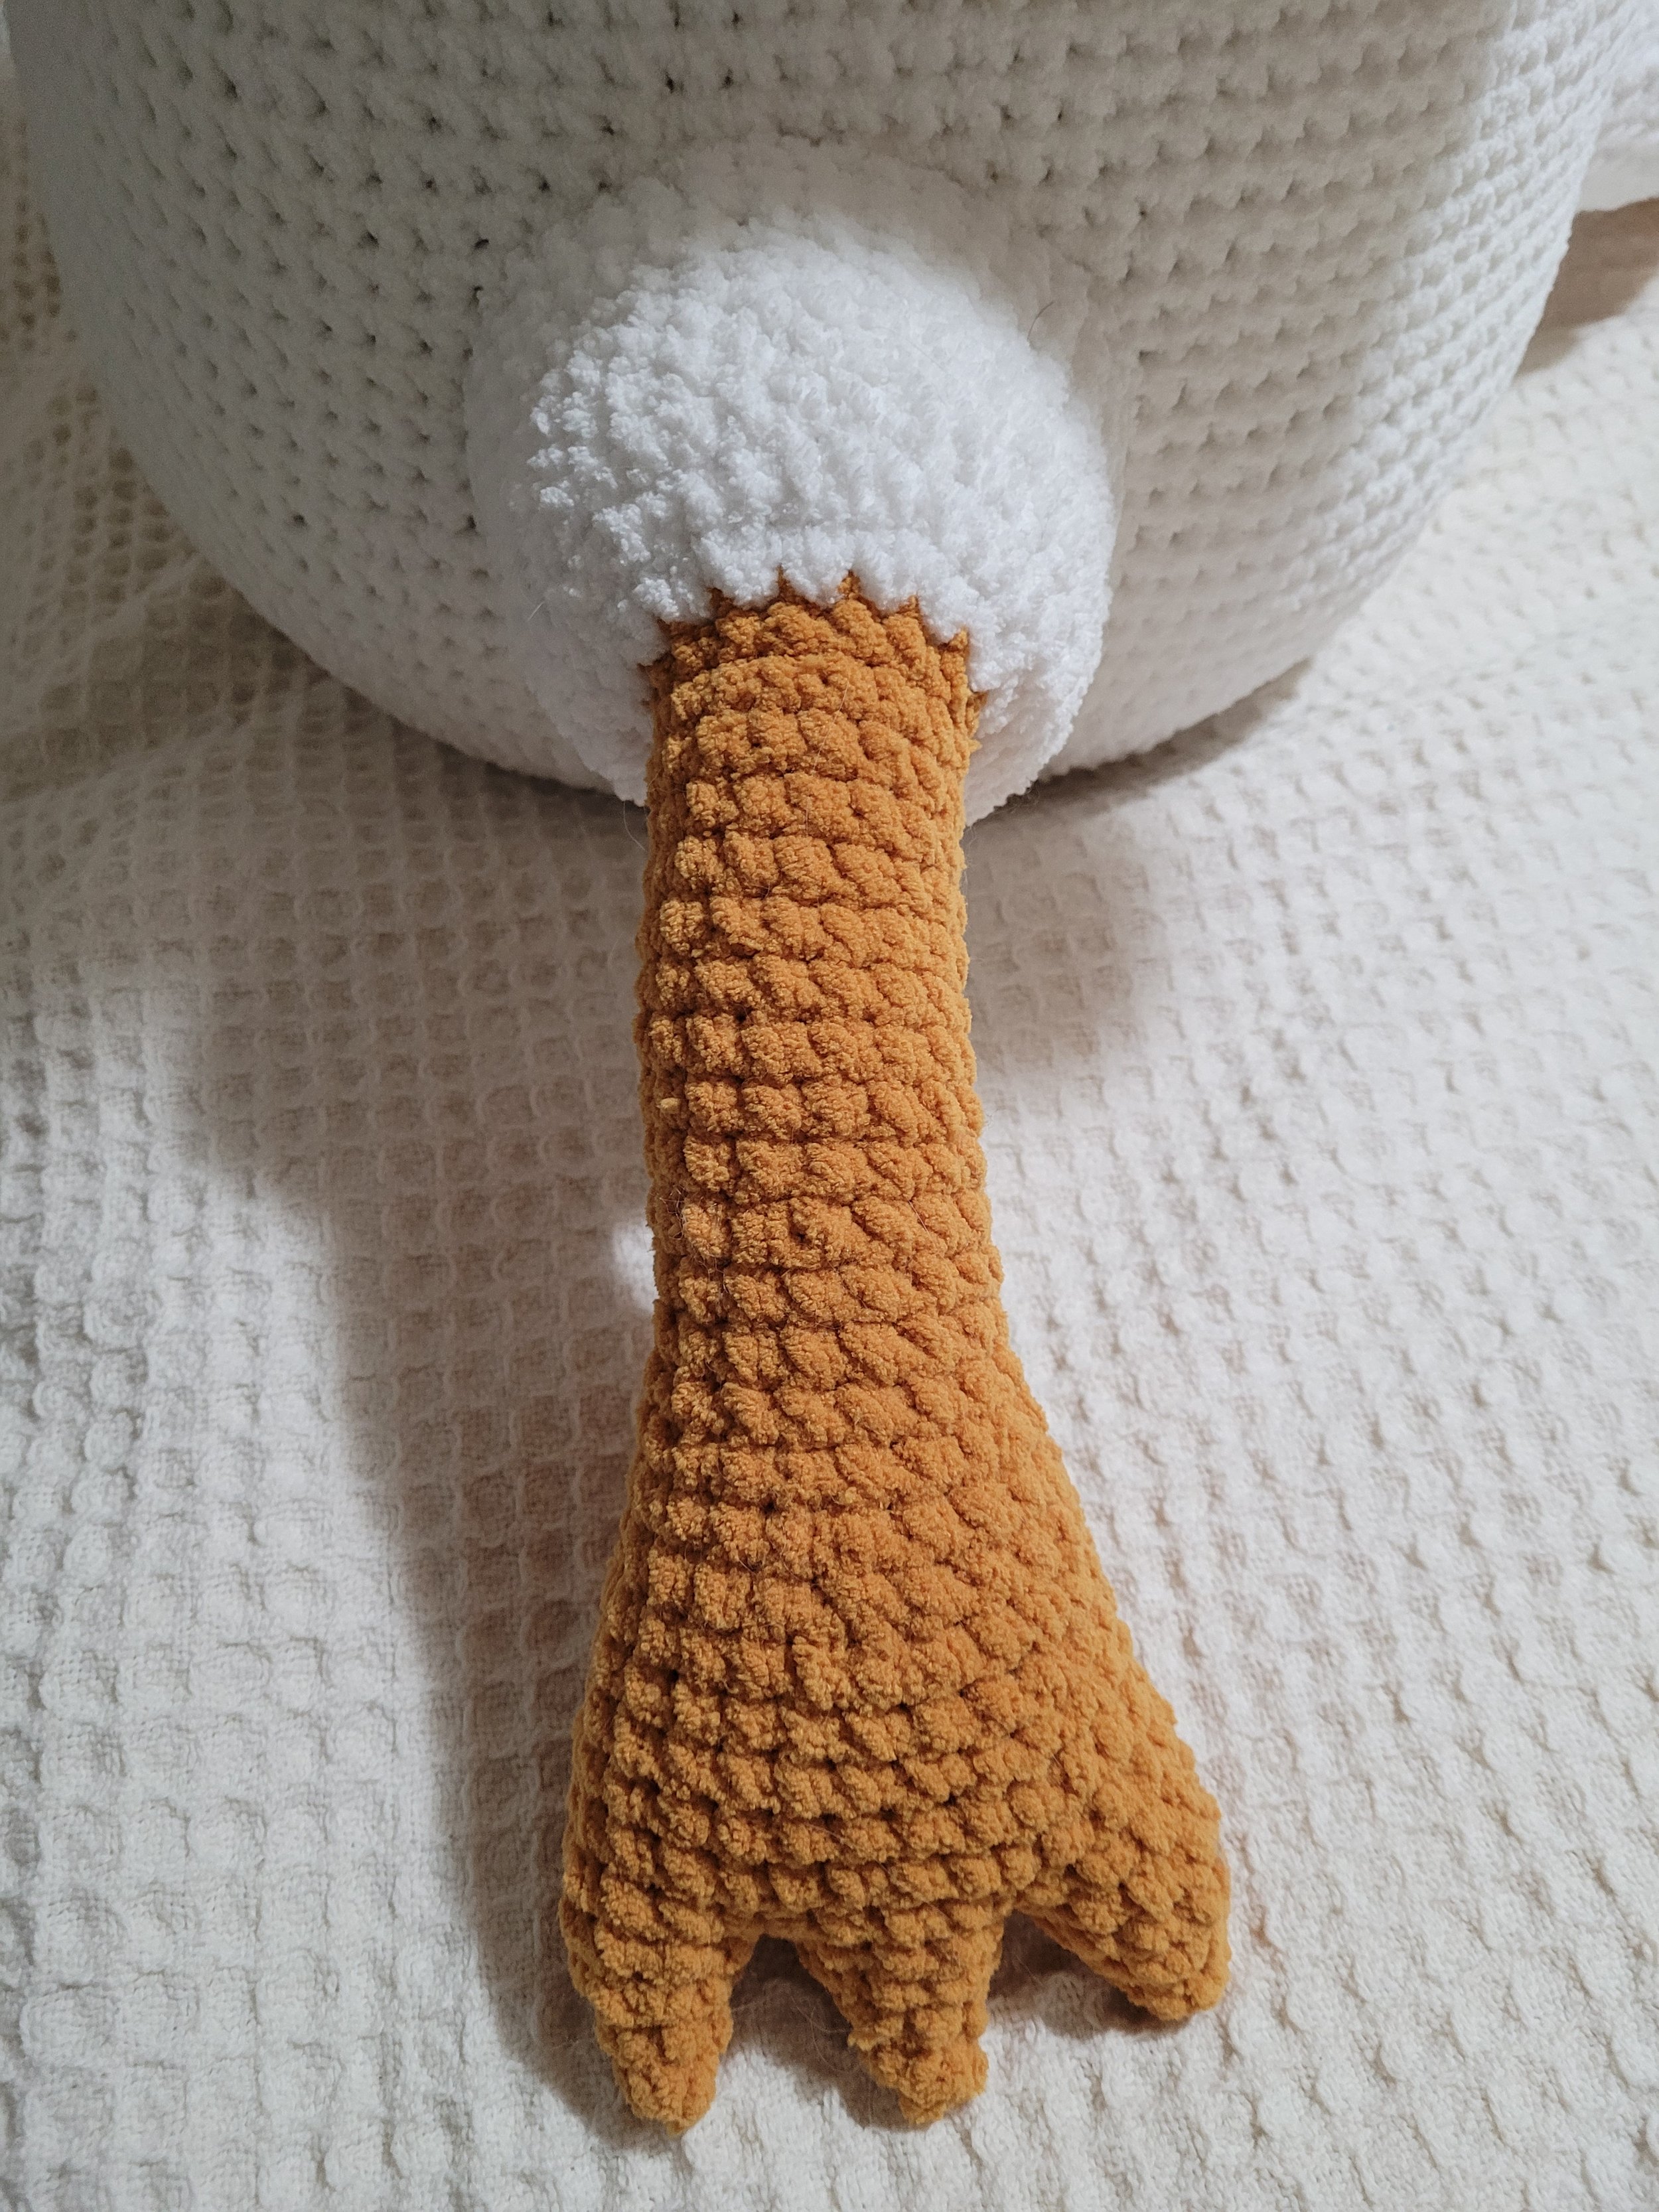
The completed leg

There will be gaps between the toes after attaching them.
You will need to sew them closed to prevent the stuffing from showing.
Beak
R1: MC, SC 6 [6]
R2: INC x 6 [12]
R3: (SC 3, INC 3) x 2 [18]
R4-5: SC around [18] 2 rounds
R6: (SC 2, INC) x 6 [24]
R7-12: SC around [24] 6 rounds
R13: (SC 3, INC) x6 [30]
R14-15: SC around [30] 2 rounds
SLST and FO, leaving a long tail for sewing.
Stuff
Tail
Middle feather
R1: Form a MC, SC 6 [6]
R2: SC around [6]
R3: (SC, INC) x 3 [9]
R4: SC around [9]
R5: (SC x 2, INC) x 3 [12]
R6: SC around [12]
R7: (SC, INC) x 6 [18]
R8: SC around [18]
FO
Side feathers (Make 2)
R1: Form a MC, SC x 6 [6]
R2-3: SC around [6]
R4: (SC, INC) x 3 [9]
R5: SC around [9]
R6: (SC x 2, INC) x 3 [12]
FO 1st side feather. On 2nd feather, do not FO and continue to next step
Following the same method as we used on the feet to attach the toes, we will attach the 3 feathers that make up the tail.
R7: Place hook into a stitch on the middle feather and SC x 9, Place hook into a stitch on the 2nd side feather and SC x 12, Place hook back into the next stitch on the middle feather and SC x 9, Place hook back into the 1st side feather and SC x 12 [42]
R8: SC around [42]
R9: (SC x 6, INC) x 6 [48]
R10: SC around [48]
R11: (SC x 7, INC) x 6 [54]
R12: SC around [54]
R13: (SC x 8, INC) x 6 [60]
R14: (SC x9, INC) x 6 [66]
R15: (SC X 10, INC) x 6 [72]
R16: (SC x 11, INC) x 6 [78]
R17: (SC x12, INC) x 6 [84]
R18: (SC x 6, INC) x 12 [96]
R19-20: SC around [96]
Stuff lightly. Focus your stuffing efforts on the tail feathers and use only enough stuffing to even out the rest of the tail. If you over stuff, the tail will stick out from the body and look poofy.
R21: SC until you are at the edge of the tail on one side, then turn and SC through both sides of the tail to seam the tail shut [48]
FO & leave a long tail to attach

The tail attached. You will need to sew the gaps between the tail feathers, like we did for the feet.
WING (make 2)
Wingtip (make 3 for each wing, 6 in total)
R1: Form a MC, SC x6 [6]
R2: SC x3, INC X 3 [9]
R3: SC x4, INC, (SC, INC) x 2 [12]
R4: SC around [12]
FO the first 2 wingtips. On 3rd wingtip do not FO & continue on to next step
R5: SC x 5, INC x 6, SC x 1 [18]
R6: SC around [18]
In the next round, we will be attaching the 3 wingtips in the same way we did for the toes and the tail feathers. However, in this step it is important that we align the wingtips in the same direction. You will notice that the wingtips are straight on one side and diagonal on the other. We want the diagonal sides to be pointing in the same direction (i.e. straight sides on the right, diagonal sides on the left), and we will be attaching a diagonal side to a straight side. I recommend using stitch markers to mark the center stitch on each side of the wingtips to ensure correct placement. Your starting stitch count may not line up exactly with mine, however what is important is that you make sure you attach the wingtips diagonal side to straight side.
R7: SC until you are at the center of the diagonal side of the wingtip, Place hook into next wingtip and SC x 6, Place hook into 3rd wingtip and SC x 12, Place hook into middle wingtip and SC x 6, Place hook into largest wingtip and SC x 7 or until you are at the center of the straight side of the wing [42]

Wing close-up view:
Here you can see the wingtips slant in the same direction. All of the increases were done on the left side of the wing and the right side of the wing is straight.
You will need to sew the gaps between the wingtips, just like we did for the toes.
Going forward, what is most important is making sure that on increase rounds, your increases are placed at the center of the diagonal side of the wing. If your stitch count to get to the placement is different than mine, that is fine, as long as your increases are placed on the diagonal side of the wing, your wing will turn out fine
R8: SC x 24, INC x 3, SC x 15 [45]
R9: SC around [45]
R10: SC x 25, INC x 3, SC x 17 [48]
R11: SC around [48]
R12: SC x 26, INC x 3, SC x 19 [51]
R13-15: SC around [51] 3 rounds
R16: SC x 29, INC x 3, SC x 19 [54]
R17-19: SC around [54] 3 rounds
R20: SC x 31, INC x 3, SC x 20 [57]
R21-23: SC around [57] 3 rounds
R24: SC x33, INC x 3, SC x 20 [60]
R25-29: SC around [60] 5 rounds
R30: SC until you reach the edge of the wing, turn & SC through both sides of the wing to seam it closed [30]
FO & leave a long tail to attach
Body
R1: Form a MC, SC x 8 [8]
R2: INC around [16]
R3: (SC, INC) x 8 [24]
R4: (SC x 3, INC) x 6 [30]
R5: (SC x 4, INC) x 6 [36]
R6: (SC x 5, INC) x 6 [42]
R7: (SC x 6, INC) x 6 [48]
R8-21: SC around [48] 14 rounds
R22: (SC x 6, DEC) x 6 [42]
R23: (SC x 5, DEC) x 6 [36]
R24: (SC x 4, DEC) x 6 [30]
Stuff head
R25-39: SC around [30] 15 rounds
I find it best to stuff the neck as you go. If you wanted to insert a pool noodle or something else to stabilize the neck, do that now. I did not add anything other than poly-fil to mine, because I wanted my goose to be soft, floppy, & huggable.
R40: (SC x 4, INC) x 6 [36]
R41-43: SC around [36] 3 rounds
R44: (SC x 5, INC) x 6 [42]
R45-47: SC around [42] 3 rounds
R48: (SC x 6, INC) x 6 [48]
R49-51: SC around [48] 3 rounds
R52: (SC x 7, INC) x 6 [54]
R53-55: SC around [54] 3 rounds
R56: (SC x 8, INC) x 6 [60]
R57-59: SC around [60] 3 rounds
R60: (SC x 9, INC) x 6 [66]
R61-63: SC around [66] 3 rounds
R64: (SC x 10, INC) x 6 [72]
R65-67: SC around [72] 3 rounds
R68: (SC x 11, INC) x 6 [78]
R69-71: SC around [78] 3 rounds
R72: (SC x 12, INC) x 6 [84]
R73-75: SC around [84] 3 rounds
R76: (SC x 13, INC) [90]
R77: SC around [90]
R78: (SC x 14, INC) x 6 [96]
R79: SC around [96]
R80: (SC x 15, INC) x 6 [102]
R81: SC around [102]
R82: (SC x 16, INC) x 6 [108]
R83: (SC x 17, INC) x 6 [114]
R84: (SC x 18, INC) x 6 [120]
R85-102: SC around [120] 18 rounds
Stuff
R102: (SC x 9, INC) x 12 [132]
R103-112: SC around [132] 10 rounds
R113: (SC x 9, DEC) x 12 [120]
R114: (SC x 8, DEC) x 12 [108]
R115: (SC x 7, DEC) x 12 [96]
R116: (SC x 6, DEC) x 12 [84]
R117: (SC x 5, DEC) x 12 [72]
R118: (SC x 4, DEC) x 12 [60]
R119: (SC x 8, DEC) x 6 [54]
Stuff more
R120: (SC x 7, DEC) x 6 [48]
R121: (SC x 6, DEC) x 6 [42]
R122: (SC x 5, DEC) x 6 [36]
R123: (SC x 4, DEC) x 6 [30]
R124: (SC x 3, DEC) x 6 [24]
R125: (SC x 2, DEC) x 6 [18]
R126: (SC, DEC) x 6 [12]
R127: DEC around [6]
Add any additional stuffing, if needed. Cut yarn, pull through the loop on the hook, thread the tail onto a needle, sew through the FLO, and pull tight to close the MC. Secure & Bury tail in the body of the goose
ASSEMBLY

Sew the beak to the head at round 4.

Attach the eyes at rounds 9-11, approx. 16 stitches apart.
Sew the legs approx. 22 stitches apart on approx. rounds 95-105.

Here is a photo of the leg spacing
Ignore the cat legs in the photos here. In my house, it’s hard to take photos of something this large and not get a cat in the shot.
Sew the wings on approx. rounds 58-88 with a slant of about 4 stitches. Wings should be about 30 stitches apart on the back of the goose at round 58.

The wings, spread out so you can see the placement.

The goose from the side, so you can see the wings & leg placement in reference to each other.
Sew the tail to the center of the back of your goose at round 111-112, right before the goose’s butt starts to decrease. Be sure to attach to the back of your goose and not the belly! I left it until last in the instructions to help avoid that catastrophe 😀
YOU DID IT!!! Behold, your giant goose in all its glory!

Giant goose crochet pattern
Copyright 2023, Virginia Grace Kelley
All rights reserved
You are welcome to sell and share any geese you make with this pattern, as long as I am credited as the designer. Pattern not for distribution, sharing, reproduction or resale. No part of this pattern, including photos, may be used, shared, sold, reproduced, altered or redistributed in any way without express written consent from author & copyright holder, Virginia Grace Kelley.